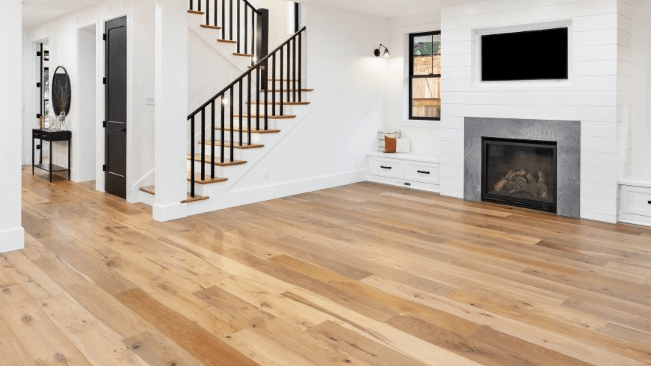
Hardwood floors are a timeless and elegant addition to any home, offering a versatile and durable surface that enhances the overall aesthetic. Whether you’re a DIY enthusiast or a homeowner exploring renovation options, this beginner’s guide will walk you through the process of installing hardwood floors in your home.
Understanding the Benefits of Hardwood Floors
Hardwood floors can significantly elevate the aesthetic appeal of your home, presenting an air of timeless sophistication and warmth that can meld seamlessly with almost any interior design theme, be it traditional or contemporary. One of the primary advantages of hardwood floors is their exceptional durability. With the right care, these floors can retain their beauty for several decades, making them an excellent long-term investment. Apart from their long lifespan, hardwood floors also contribute to a healthier living environment. Unlike carpeted floors, they do not trap allergens and are relatively effortless to clean, ensuring a cleaner and healthier atmosphere in your home.
Selecting the Right Type of Hardwood
When it comes to choosing the perfect hardwood for your home, several considerations come into play. You’ll want to think about the function of the room, the climate of your area, and of course, your budget. You’ll be primarily deciding between two main types: solid hardwood and engineered hardwood.


Solid hardwood is typically thicker and offers the unique advantage of being able to be sanded and refinished numerous times. This means it can withstand years of wear and still look as good as new. However, it’s important to remember that solid hardwood may not fare as well in areas prone to moisture or drastic temperature changes due to its natural properties.
Conversely, engineered hardwood is built with multiple layers, providing increased stability and greater resistance to changes in humidity and temperature. This makes it a particularly good choice for rooms that experience more moisture, like bathrooms and basements, or in areas with fluctuating climates.
Whether you opt for the traditional beauty of solid hardwood or the practical durability of engineered hardwood, remember that your choice will play a key role in both the longevity and appearance of your floors.
Preparing for Installation
Before the actual installation of your hardwood floors can commence, it’s crucial to properly prepare the surface on which they will lay. The subfloor – the layer of flooring under your current floor – needs to be thoroughly inspected and prepped. Start by ensuring it is clean and free of any debris. Next, confirm that it is dry. Moisture can lead to warping or damage to your hardwood floors, so ensuring a dry subfloor is essential. Finally, ensure the subfloor is level. Uneven subfloors can lead to uneven hardwood floors and may cause issues over time. If your subfloor is uneven, consider hiring a professional to level it before proceeding.
After prepping the subfloor, remove any existing flooring and baseboards if necessary. This provides a clean and level surface for your new hardwood floors.
Lastly, it’s crucial to let your hardwood acclimate to the humidity levels in your home. To do this, leave the hardwood in the room where it will be installed for several days. This can help prevent warping or other issues caused by sudden changes in humidity after installation. Preparation is key in the process of installing hardwood floors, ensuring a smooth installation process and a beautiful end result.
The Installation Process
Embarking on the actual installation phase of your hardwood floors starts with meticulously arranging your initial row of planks. This primary row should be both straight and securely fixed to ensure the following rows align properly. A flooring nailer can be your best ally in this step, allowing you to fasten the boards onto your previously prepped subfloor efficiently.
Be conscious of the need for an expansion gap along the wall. This gap, typically a small clearance space, is a crucial detail as it accommodates any expansion or contraction of the wood due to temperature and humidity changes.
As you progress, aim for a staggered layout of the end joints between successive rows. This pattern not only enhances the natural look of your hardwood floors but also adds to their structural integrity.
Custom cutting of the boards may be required to ensure a perfect fit around the corners and edges. Aim for a snug alignment of the planks against each other. This will minimize any potential gaps which could detract from the beauty of your hardwood floors and potentially lead to issues down the line.
Remember, the installation process is more than just laying down the boards. It’s about paying attention to the details that contribute to the final look and longevity of your hardwood floors.
Read also 7 Must-Know Tips for Navigating arcabomb
Finishing Touches on Your Hardwood Floors
With the installation phase complete, your attention now turns to the final stages of your hardwood flooring project. It’s time to create a smooth and polished appearance with the right finishing procedures. First up is the sanding process, which helps to eliminate any small imperfections and create a seamless surface. Sanding should be done meticulously, as it sets the stage for the subsequent steps.
Next, you may choose to stain your floor. This step is optional and depends on the desired color of your hardwood floors. A stain can significantly change the color, giving your floors a completely different look. Therefore, it’s important to select a stain that aligns with your aesthetic preferences and complements the overall interior design of your home.
The last step in the process is the application of a protective finish. This layer serves to shield your new floors from the daily wear and tear, ensuring the longevity of your investment. This protective coat not only enhances the durability of your hardwood but also impacts its look, offering a range of finishes from matte to glossy. Therefore, it’s vital to carefully choose a finish that matches your lifestyle and design sensibilities.
The right finishing touches will bring out the beauty of your hardwood floors, showcasing the natural grain and color while providing a durable surface that can withstand daily use. These final stages, although often overlooked, are crucial in enhancing and preserving the charm of your hardwood floors.
Maintaining Your Hardwood Floors
Once your hardwood floors are installed and looking beautiful, it’s essential to implement a consistent maintenance routine to prolong their life and keep them looking their best. Daily upkeep is straightforward; use a broom or vacuum cleaner to remove dust, dirt, and other particles that might potentially scratch your floors. Be mindful to address spills promptly. Liquid can seep into the wood and cause damage if left unattended, so make it a habit to wipe up any spillage as soon as it happens. To further prevent surface scratches, consider adding protective pads to the feet of your furniture. This small addition can make a significant difference in preserving the surface of your floors. Lastly, don’t forget to refinish your floors periodically. This process restores the protective coating that shields the hardwood from wear and tear, ensuring your floors retain their shine and continue to enhance the beauty of your home. In conclusion, while hardwood floors do require some maintenance, the effort is minimal compared to the value and aesthetic they bring to your home. If you need hardwood floors Indianapolis, check out ProSand.